Today, sensors play a key role in the security of various apartments, houses, and offices by detecting fire, smoke, or gas with an alarm function. The MQ2 gas sensors are widely used in smoke and gas detection. This sensor can detect smoke, and harmful gases like alcohol, LPG, propane, methane, hydrogen, and carbon monoxide. It is used in various applications such as air quality monitoring systems, smoke detectors, fire detection systems, breath checkers, etc. This article explains the interfacing of an MQ2 gas sensor with an Arduino (MQ2 Arduino gas sensor) to detect and measure the level of gas concentration in the environment.
The alternatives for MQ2 gas sensors are MQ3 (alcohol, smoke, ethanol), MQ4 (CNG gas, methane), MQ5 (LPG, and natural gas), MQ6 (butane, and LPG), MQ7 (CO), MQ8 (hydrogen), MQ9 (flammable gases and CO), MQ138 (benzene, alcohol, toluene, propane, hydrogen and formaldehyde gas), MQ214 (natural gas and methane), MQ303A (smoke, alcohol, and ethanol), MQ306A (smoke and LPG), MQ307A (CO), MQ309A (flammable gas and CO), AQ2 and AQ3.
What is an MQ2 Arduino Gas Sensor?
The MQ2 Arduino gas sensor is the most widely used gas detecting sensor, which belongs to the MQ series sensors. These are MOS (metal oxide semiconductor) type sensors, also called chemiresistors because they detect based on the changes in the sensing material resistance when the gas is pointed closer to the material. The gas concentration can be determined with a voltage divider network.
The MQ2 Arduino gas sensor operates at 5 VDC and consumes approximately 800 mW. It monitors and detects the presence of gases like propane, butane, smoke, alcohol, hydrogen, LPG methane, flammable gases, and carbon monoxide at levels ranging from 300 to 10,000 ppm in the atmosphere. It can be used as a smoke detector.
The MQ2 gas sensor module is useful for detecting gas leaks in domestic and industrial environments. It can monitor the level of gas in the atmosphere. It has a sensitive semiconductor material Sno2, with lower conductivity in the fresh air, and helps in the detection of gas concentration levels in its conductivity. The change in conductivity can be converted to gas concentration with the help of an electronic circuit.
Depending on the concentration, the sensor monitors the potential difference to change the resistance of the material inside the sensor. The value of the output voltage indicates the type of gas. These sensors generally come with comparators, which can set the threshold value for the gas concentration. The digital output goes HIGH only when the gas concentration exceeds the threshold value. The sensor operates in analog mode to determine the gas concentration.
MQ2 Arduino Gas Sensor Pin Configuration/Pin Diagram:
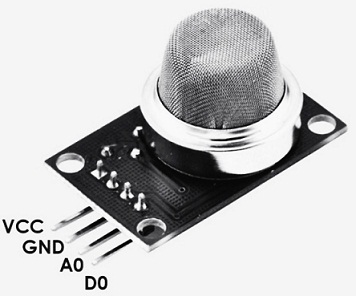
The MQ2 Arduino gas sensor is a gas detecting sensor that comes with 4-pins. The MQ2 gas sensor pin configuration/pin diagram is described below.
For the MQ2 Gas Sensor Module:
These sensors are most commonly used to detect or measure a particular gas concentration. To measure the presence of a particular gas, the MQ2 gas sensor module is preferred. Since it has an operational amplifier comparator and a digital output pin. This module comes with 4-pins like VCC, GND, DO, and AO.

MQ2 Gas Sensor Module
VCC: This pin is used for a positive voltage supply connection of 5V to power up the module.
GND (Ground): The module is connected to the ground using this pin.
Digital Out (DO): This pin is used to generate the digital output of the module when the threshold value is set with the help of a potentiometer. It gives the digital output either High Or Low based on the presence of gas.
Analog Out(AO): This pin gives the analog output voltage in the range of 0V to 5V, which depends on the gas intensity.
For the MQ2 Gas Sensor:
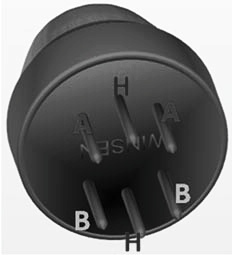
These gas sensors are available in either module or just sensors. To measure the gas concentration and the PPM of gas, then MQ2 gas sensor is recommended (No need for the module). It comes with 6-pins given below.

MQ2 Gas Sensor
H-pins: This sensor contains two H-pins, where one is for supply connection and the other is for ground connection.
A-pins: There are two A-pins as shown in the figure. These are connected to the voltage supply. Since A-pins and B-pins can be interchanged.
B-pins: There are two B-pins, where one pin is the output pin and the other pin is pulled to the ground.
Technical Specifications and Features:
The MQ2 gas sensor technical specifications and features are given below.
- It is a semiconductor-type gas sensor with bakelite (black bakelite) standard encapsulation.
- Sensitivity to combustible gas is good.
- High sensitivity to LPG, hydrogen, and propane.
- Low cost and long life.
- Simple drive circuit.
- Detects smoke, combustible gas, LPG, propane, alcohol, hydrogen, methane, and CO
- Its operating voltage: is +5V.
- Analog output voltage: 0V – 5V.
- Digital output voltage: 0V Or 5V (TTL logic). That is High Or Low.
- Preheat duration: 20 seconds.
- Operates as either digital or analog sensor.
- The potentiometer is used to vary the digital pin sensitivity.
- Gas concentration: 300-10000ppm.
- Loop voltage Vc: ≤24V DC.
- Heater voltage: VH: 5.0V±0.2V AC or DC.
- Load resistance RH: 31 ohms±3ohms at room temperature.
- Heater consumption PH: ≤900mW.
- Sensing resistance Rs: 2 kilo-ohms to 20 kilo-ohms in 2000ppm C3H8.
- Sensitivity S: Rs(in the air) / Rs(1000ppm of butane) ≥5.
- Slope: ≤0.6 (R at 5000ppm/R at 3000ppm CH4).
- Humidity: 20°C±2°C; 65%±5%RH.
- Preheat time: over 48 hours.
- Standard test circuit: VC= 5.0V±0.1V and VH = 5.0V±0.1V.
Circuit Diagram/How to Use?
The output voltage of the MQ2 gas sensor changes according to the presence of gas or smoke levels in the environment. It gives the output proportional to the gas/smoke concentration. That means that if the gas concentration is high, the sensor’s output voltage is also high. Similarly lower voltage for the low gas concentration.

Interfacing MQ2 Gas Sensor with Arduino UNO
This output would be either analogue output (AO) signal from the analogue out a pin or digital output (DO) from the digital out pin of the sensor, which can be read using an Arduino. The output generated either in digital format or analogue format can be read using an Arduino. Therefore it is also referred to as the MQ2 Arduino sensor.
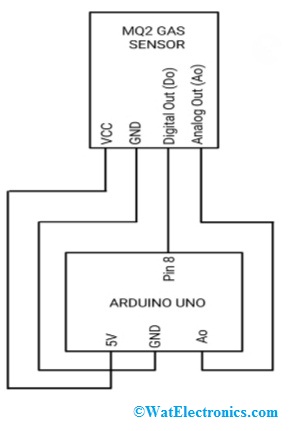
Now let’s know the interfacing MQ2 gas sensor with Arduino. The circuit diagram is shown in the figure below. The components required are,
- Arduino
- MQ2 gas sensor module
- Voltage supply of +5V
- Connecting wires.
Make the connections as shown in the figure above. The VCC pin and GND pins of the sensor module are connected to the +5V pin and GND of the Arduino. The digital out (DO) pin of the sensor module is connected to digital pin 8 of the Arduino and the analogue out pin (AO) of the sensor module is connected to the AO pin of the Arduino to read the output.
Upload the Arduino code to read the analog output or digital output. Since the analogue output voltage generated is based on the gas concentration. And the digital output level (high/low) is based on the threshold value, which is set by using the potentiometer of the sensor module.
> Arduino code to read the analogue output using the analogue out (AO) pin of the sensor module.
In this case, the analogue output voltage ranges from 0V to 5V obtained from the analogue pin depending on the level of gas concentration. The higher the analogue output voltage means the higher the gas concentration.
#define MQ2pin (0)
float sensorValue; // assign variable to store sensor value
void setup()
{
Serial.begin(9600); // serial port is set to 9600
Serial.println(“Gas sensor warming up!”);
delay(20000); // initialization of serial communication and wait for 20 seconds to allow the MQ2 sensor to warm up
}
void loop()
{
sensorValue = analogRead(MQ2pin); // read analogue input pin 0
Serial.print(“Sensor Value: “);
Serial.print(sensorValue); (sensor value is displayed on the monitor)
if(sensorValue > 300) (if the gas concentration is greater than 300, then the gas detected message is displayed)
{
Serial.print(” | Gas detected!”);
}
Serial.println(“”);
delay(2000); // wait 2 seconds for the next reading
}
Arduino code to read the digital output using the digital out (DO) pin of the sensor module.
Detecting gases with the MQ2 gas sensor is very easy. For this, we use either digital pins or analogue pins. Just apply 5V to power up the module and we can observe that the module’s power LED is ON (glows) and the output LED is OFF when no gas is detected. This means that the digital output of the module is 0V. Note that the sensor should be kept for 20 seconds of preheating time before the actual operation.
Now, when the MQ2 gas sensor is kept near to the gas which is to be detected, we can see that the LED output increases along with the digital output. Otherwise, use the potentiometer until the output increases. Whenever the sensor detects a certain gas concentration, the digital pin goes high (5V), otherwise it stays low (0V). This value is directly proportional to the gas concentration produced by the sensor. The Arduino code is developed and uploaded to check the different gas concentrations detected by the sensor module, as shown below.
int sensor=8;
int gas_value;
void setup()
{
pinMode(sensor,INPUT);
Serial.begin(9600);
}
void loop()
{
gas_value=digitalRead(sensor);
Serial.println(gas_value);
}
Where to Use/Applications of MQ2 Arduino Gas Sensor:
The applications of the MQ2 Arduino gas sensor are;
- Used to monitor or detect or measure the various gases like alcohol, hydrogen, propane, LPG, CO, and methane.
- Used as an air quality monitor.
- Used for standard safety maintenance.
- Used to maintain environmental standards in hospitals.
- Used as a gas leak alarm.
- Used as a domestic gas leakage detector.
- Used as a gas detector in industries.
- Portable gas detector.
- Smoke detector.
Please refer to this link for MQ2 Gas Arduino Sensor Datasheet.
Thus, this is all about an overview of the MQ2 Arduino gas sensor. There are alternatives and equivalents of the MQ2 gas sensors, which can detect the gases like LPG, CO, methane, alcohol, smoke, and propane. Check out the datasheet and choose the sensor that meets your project requirements.