The controlling of street lights, make a light sensor circuit outdoor lights, a few indoor home appliances, and so on are usually maintained and operated manually on several occasions. This is not only risky but also results in wastage of power with the negligence of personnel or unusual circumstances in controlling these electrical appliances on and off. Hence, (based on the requirement) we can utilize the light sensor circuit for automatic switching of the loads based on daylight’s intensity by using a light sensor. In this article, we discuss in brief about how to make a light sensor circuit and its working operation.
What is Sensor?
Before going to learn about the light sensor, primarily, we must know what is sensor. Sensor is a device that is used to detect the changes in quantities or events and appropriately produce the outputs.
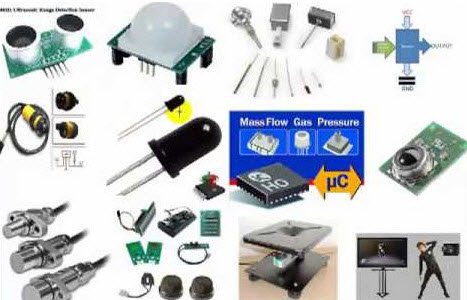
Different Types of Sensors
There are different types of sensors such as light sensors, temperature sensor, humidity sensor, pressure sensor, fire sensor, ultrasonic sensors, IR sensor, touch sensor, and so on.
What is a Light Sensor Circuit?
The light sensor circuit is a simple electrical circuit, which can be used to control the (switch on and off) electrical load appliances like lights, fans, coolers, air conditioners, street lights, etc., automatically. By using this light sensor circuit, we can eliminate manual switching as the loads can be controlled automatically based on the daylight intensity. Hence, we can describe it as an automatic light sensor.
The light sensor circuit helps to evade the manual control of the street lights erected on highways which is risky and also causes wastage of power. The light sensor circuit consists of major electrical and electronic components such as light sensor, Darlington pair, and relay. To understand the working operation of the light sensor circuit, we must know a brief about the components used in designing the light sensor circuit.
Light Sensor
There are different types of light sensors available such as photoresistors, photodiodes, photovoltaic cells, phototubes, photomultiplier tubes, phototransistors, charge coupled devices, and so on. But, LDR (Light Dependent Resistor or photoresistor) is used as a light sensor in this light sensor circuit. These LDR sensors are passive and doesn’t produce any electrical energy.
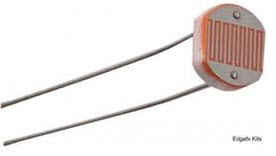
LDR Light Sensor
But, the resistance of the LDR changes with the change in the (light illuminated on the LDR) daylight intensity. LDR sensor is rugged in nature, hence can be used even in dirty and rough external environments. Hence, LDR is preferable compared to other light sensors as it can be used even in the outdoor lighting of homes and in automatic street lights as well.
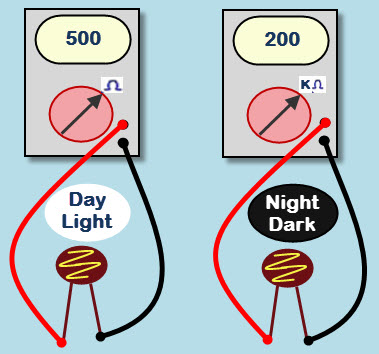
LDR Resistance Variation with Variation in Light Intensity
Light Dependent Resistor is a variable resistor that is controlled by light intensity. LDRs are made of high resistance semiconductor material, Cadmium Sulphide that exhibits photoconductivity.
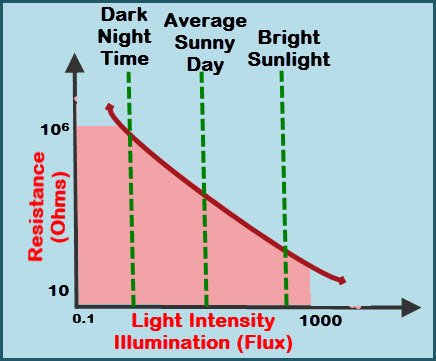
Light Intensity vs LDR Resistance
During night time (when the light illuminated on LDR decreases), the LDR exhibits a very high resistance of around a few MΩ (Mega Ohms). During daytime, (when the light is illuminated on LDR), resistance of LDR decreases to around a few 100Ω (hundred Ohms). Hence, the resistance of LDR is inversely proportional to the light illuminated on LDR.
As shown in the above figure, the LDR consists of two terminals similar to a general resistor and a wave-shaped design on its top surface. The graph shown above represents the inverse proportionality of the LDR with the light intensity.
The major drawback of the LDR is that, it is sensitive to light illuminated on it irrespective of the nature of light (natural daylight or even artificial light).
Darlington Pair
The back-to-back connection of two transistors is called as a Darlington pair, this Darlington pair transistor connection is used in this light sensor circuit.
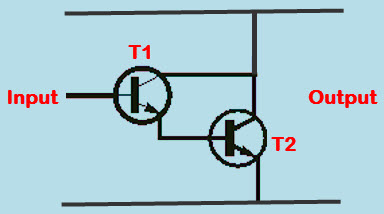
Darlington Pair
This Darlington pair transistor is also considered as a single transistor that has very high current gain compared to the general transistor gain. The product of input current and gain of the transistor gives the input given to the load through the Darlington pair. We know that, if the base voltage must be greater than 0.7v, then the transistor switches on – but, in case of Darlington pair, the base voltage must be 1.4v as the two transistors are required to be switched on.
Relay
A relay plays a vital role in the light sensor circuit for activating the load or for connecting the load to the light sensor circuit as well as to the AC mains.
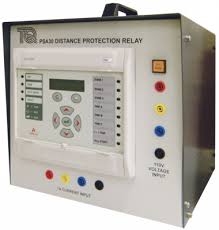
Relay
Generally, the relay consists of a coil, this coil gets energized whenever it gets enough supply (required amount of supply depends on the rating of the relay).
Light Sensor Circuit Working Operation
The light sensor circuit is an electronic circuit designed using (light sensor) LDR, Darlington pair, relay, diode, and resistors which are connected as shown in the light sensor circuit diagram. A 230v AC supply is provided to the load (in this case, the load is represented with a lamp).
The DC voltage required by the light sensor circuit is supplied from a battery or by using a bridge rectifier circuit. This bridge rectifier circuit converts the 230v AC supply into a 6v DC. The bridge rectifier circuit utilizes a step-down transformer to step-down the 230v into 12v. The diodes connected in the form of a bridge are used to convert the 12v AC into 12v DC. The IC7806 DC voltage regulator is used to convert the 12v DC into 6v DC, and then, this 6V DC is supplied to the circuit. A 230v AC supply for both the load and the bridge rectifier is to be maintained continuously for uninterrupted operation of the light sensor circuit.
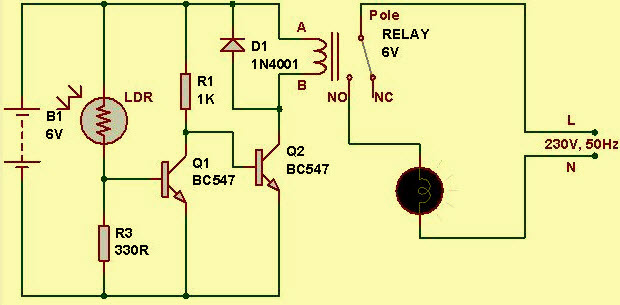
Light Sensor Circuit Diagram
During the daytime, the light sensor LDR has very-low resistance of around a few 100Ω. Thus, the supply passes through the LDR and ground through the resistor and variable resistor as shown in the light sensor circuit. This is due to the fact that the resistance offered by the LDR during daytime or when the light is illuminated on LDR is less compared to the resistance of the remaining part of the circuit (that is through relay and Darlington pair). We are aware of the principle of current, that the current always flow in the low resistance path.
Thus, the relay coil does not get enough supply to get energized. Hence, the load is switched off during the daylight.
Similarly, during the night time (when the light illuminated on LDR is very less), the LDR resistance increases to a very high value of around a few Mega ohms (approximately 20MΩ). Thus, due to very high resistance of LDR the current flow is very less or almost zero like an open circuit condition. Now, the current flows through the low-resistance path such that it increases base voltage of Darlington pair to reach more than 1.4v. As the Darlington pair is activated, the relay coil gets enough supply to get energized, and hence, the load is switched on during night time or when no light is illuminated on LDR.
Practical Applications of Light Sensor Circuit
The light sensor circuit can be used to design various practical embedded systems based sensor based projects such as security alarm system by photo electric sensor, Arduino managed high sensitive LDR based power saver for street light control system, a solar highway lighting system with auto turn off in daytime, sunset to sunrise lighting switch, and so on.
Sunset to Sunrise Lighting Switch
The sunset to sunrise lighting switch is an application of light sensor circuit that is designed to control the automatically based on the light illuminated on the LDR light sensor.
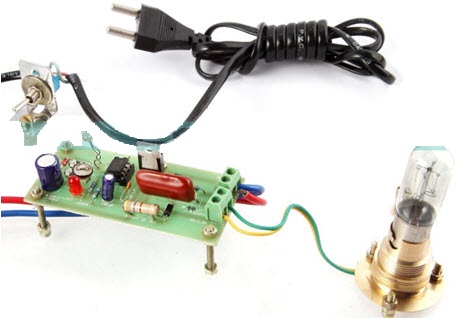
Light Sensor Circuit Application-Sunset to Sunrise Lighting Switching Project
The LDR resistance changes with the change in light intensity illuminated on LDR. The LDR output is given to 555 timer connected in bistable mode. The 555 timer output is used to control the triggering of load through a TRIAC. Thus, this light sensor circuit switches on the load in the evening or sunset and switches off the load in the morning or sun rise automatically.
Please refer to this link to know more about Embedded Systems Role in Automobiles.
Please refer to this link to know more about Ultrasonic Sensor MCQs & Humidity Sensor MCQs.
Hope, this article provides adequate information about how to make a light sensor circuit and its working operation. For designing innovative electrical and electronics projects on your own you can approach us by posting your ideas and comments in the comments section below.