At present, door sensors are installed on the doors and windows for home security purposes. These sensors allow you to know once somebody has opened/closed a door. Many house owners utilize door sensors to guard entrances. However, these sensors work on any type of door. Actually door sensors are so adaptable, so they are becoming very popular within activity triggers within smart home design. This article discusses an overview of a door sensor – working with applications
What is Door Sensor?
A door sensor is a security device, used to detect an object or a passenger at the entrance to prevent the doors from closing. Some door sensors are available with LEDs to indicate the movement of the door. For door opening, a green LED will flash whereas, for door closing, a red LED will flash.
Some door sensors are used in elevators to emit a beep sound continuously once a person enters or exits the elevator & blocks the doorway. If a person blocks the doorway of an elevator then the sensor will detect a person, and the door will reopen after that remains open & will not be closed until that person goes away from the doorway.
If the elevator doors are opened for a specific period of time, then the elevator will move into nudge mode & the elevator doors will close gradually by emitting a beep sound continuously. So these sensors will not work in this mode, therefore the fireman’s elevator still requires mechanical security edges once the sensor not working.
Door Sensor Working Principle
The working principle of a door sensor is to allow you to know once someone has opened a door. So, these sensors are so flexible, so used by many homeowners to protect door entrances. Door sensors are available with two pieces a reed switch & a magnet. The arrangement of these sensors on doors can be done like this; One piece is arranged on the frame of the door whereas the other is connected parallel to the primary piece on the door. The two parts of this sensor will make a closed circuit once the door is closed. When the door is opened, then the switch & magnet will separate to break the circuit.
Door Sensor Circuit Diagram
The door sensor circuit diagram is shown below which uses a compact & affordable Hall-effect sensor. This sensor is arranged at the corner of the door frame whereas a normal bar magnet is arranged on the door panel near the Hall-effect sensor.
Whenever the door is opened, then the magnet arranged on the door moves away from the hall sensor to generate an alert signal. This consistent & responsive door sensor works with a 9V battery. The required components to build this circuit are; the MH183 Hall effect sensor, 9V battery, LEDs, Resistors, CD4093 IC1 which includes four logic gates like IC1A, IC1B, IC1C & IC1D, and many more.
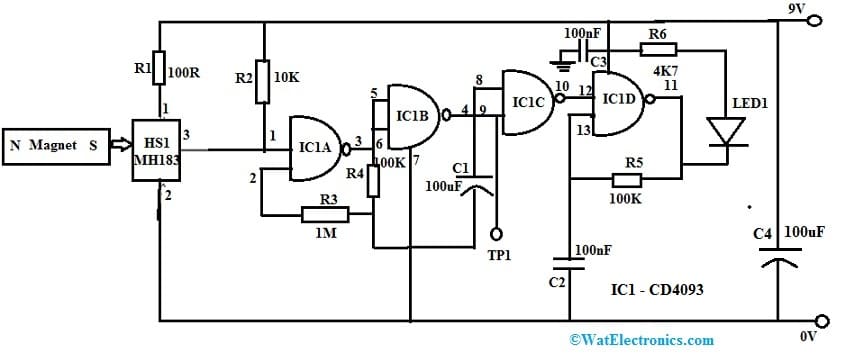
Circuit Diagram of Door Sensor
In this door sensor circuit, the heart of the circuit is the Unipolar Hall effect sensor like HS1 MH183. This sensor uses superior chopper stabilization technology to provide precise and steady magnetic switch points. This sensor includes an o/p transistor that will be switched on in the existence of an adequately strong South pole magnetic field that is facing the marked side of the package. Likewise, the o/p will be switched off in the existence of a weaker South field and remain off with zero fields. A Hall-effect sensor IC is more effective & efficient as compared to reed, optoelectronic, or inductive sensors and it is almost resistant to environmental pollutants.
The working of this door sensor is very simple & straightforward. Once the door is simply closed, the magnet is extremely near to MH183 then it is turned on condition & disables the primary oscillator formed through the two gates like IC1A & IC1B. Here, IC1 is 2-Input CD4093-Quad NAND Schmitt Trigger.
This condition is simply specified by the gradually lit red LED-like LED1. Here, this red color LED is pulsed through the relaxation oscillator wired around a single gate of IC1 like IC1D. Although, here the frequency is relatively high which is set by set by R5 & C2, and thus LED1 appears to be lit constantly.
The flow of the current of LED is restricted by the R6 resistor to a secure value. Once the door is opened, the magnet moves away from HS1 MH183. Now, this HS1 disables to allow the 2-gate oscillator like IC1A & IC1B throughout the R2 resistor. The low-frequency signals from this oscillator are inverted through IC1C to gate the IC1D on & off.
Connect the circuit on a tiny PCB as per the circuit diagram & arrange it in a proper box. Arrange the HS1 Hall sensor at the door frame’s corner & the magnet is arranged on the door by placing its south pole to the marked face of HS1. Align the magnet & Hall sensor such that once the door is closed, then LED1 will be turned ON gradually.
Door Sensor Types
There are different types of door sensors available in the market based on different manufacturers like surface mount, rollerball, overhead, pull apart & recessed sensors.
Surface Mount Door Sensor
This is the most frequently used door sensor which includes a magnet and a reed switch. A magnet is connected to the door whereas a reed switch is connected to the opposite side of the door.
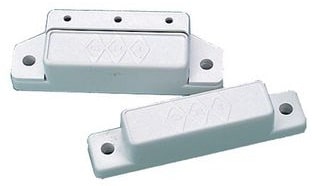
Surface Mount Door Sensor
Rollerball
These types of sensors are arranged on the recessed parts of door frames. Shutting the door can cause the hinged edge to lower the ball so that circuit will be closed.
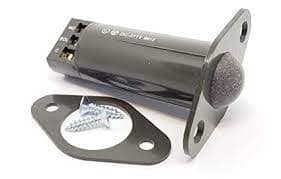
Roller Ball
Pull-apart Sensors
Usually, These sensors are used on an emergency door that means most of the time these doors remain closed. This sensor includes a wire where a magnet is connected to this end and placed into a hollow tube. Once the door is opened, then this wire pulls the magnet from the tube so that closing the door automatically won’t close the circuit.
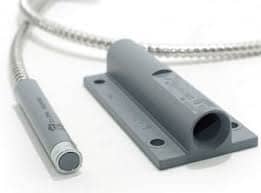
Pull-apart
Recessed Sensors
Recessed sensors are mainly used in safety systems to observe if a door is opened or closed. These sensors are connected by drilling holes inside the doors/windows. So these sensors cannot be seen.
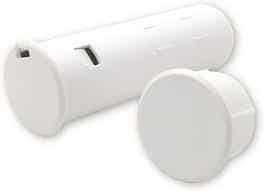
Recessed Sensors
Overhead Sensors
These are also called garage door sensors which are related to surface-mount door sensors. But the main difference between these two sensors is, that overhead sensors include a large magnet. So you have to arrange the reed switch & magnet more apart to avoid false alarms.

Overhead Sensors
Interface of Door Sensor with Arduino/Microcontroller.
The Door sensor can be simply interfaced with Arduino as shown below. The interface remains the same for connection it with other microcontroller except for the change in pin. Let see the connection below followed by the code that need to be uploaded to the microcontroller.
Door Sensor Wiring Diagram
The door sensor wiring diagram with Arduino is shown below. In this, we are going to learn how to activate a relay when the door is open and deactivate a relay when the door is closed. Here, this relay is connected to a light bulb so that we can control the light bulb by using a door sensor.
The required components of this door sensor wiring mainly include a 12V adapter, Arduino Uno, USB 2.0, Door sensor, relay, warning light, jumper wires, etc.
The door sensor includes two main components like one reed switch including two pins & a magnet The working of this door sensor is; that the magnet is connected to the door & reed switch is connected to the frame of the door. Once the door is closed then these two components are within contact.
When the magnet is near the reed switch then the reed switch circuit is closed. Similarly, when the magnet is away from the reed switch then the reed switch circuit will be opened.
A relay is a programmable switch that can be controlled simply by an Arduino Uno. This switch is used for controlling the devices like warning lights that use high current or high voltage. This relay includes two groups of pins like input group (low voltage) and the output group (high voltage).
The pins in the input group are DC-, DC+, and IN pins.
DC- pin is connected to the GND pin of an Arduino.
DC+ pins are connected to VCC.
IN pin gets the control signal from the Arduino board.
The pins in the output group are COM, NO pin, and NC pin which are connected to the high voltage device like a warning light.
COM pin or Common pin is used in both NO or NC mode.
NO pin or Normally open pin is used within NO mode.
NC pin or Normally closed pin is used within NC mode.
The connection of this wiring follows as; the reed switch’s one pin is connected to the GND pin of Arduino whereas another pin is connected to the input pin of Arduino. Once the magnet is near the reed switch then the input pin value of Arduino is low. Once the magnet is far away from the reed switch then the input pin value of Arduino is high.
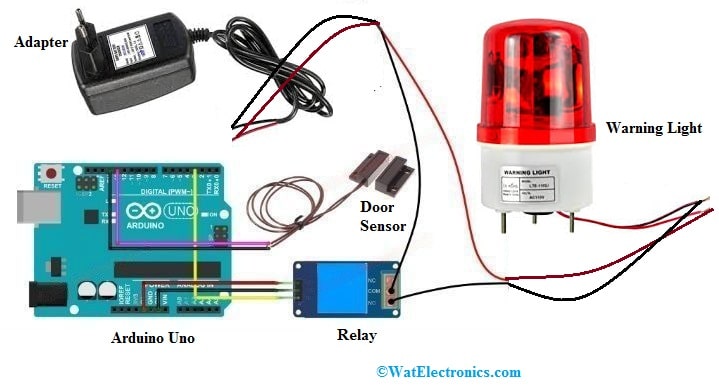
Door Sensor Wiring Diagram
So, to verify the door’s status, we need to check the condition of the input pin of the Arduino.
If the condition changes from a low state to a high then the event of a door opening is detected.
If the condition changes from a high state to low then the event of the door closing is detected.
Code
The code for door opening & closing events is shown below.
const int DOOR_SENSOR_PIN = 13; // Arduino pin connected to door sensor’s pin
int currentDoorState; // current state of door sensor
int lastDoorState; // previous state of door sensor
void setup() {
Serial.begin(9600); // initialize serial
pinMode(DOOR_SENSOR_PIN, INPUT_PULLUP); // set Arduino pin to input pull-up mode
currentDoorState = digitalRead(DOOR_SENSOR_PIN); // read state
}
void loop() {
lastDoorState = currentDoorState; // save the last state
currentDoorState = digitalRead(DOOR_SENSOR_PIN); // read new state
if (lastDoorState == LOW && currentDoorState == HIGH) { // state change: LOW -> HIGH
Serial.println(“The door-opening event is detected”);
// TODO: turn on the alarm, light, or send a notification …
}
else
if (lastDoorState == HIGH && currentDoorState == LOW) { // state change: HIGH -> LOW
Serial.println(“The door-closing event is detected”);
// TODO: turn off alarm, light, or send notification …
}
}
Copy this code & open it in Arduino IDE.
Click the upload button on the IDE for uploading this code into Arduino.
Move the magnet near the reed switch & move it away from the reed switch and check the results on the serial monitor.
Door Sensor Vs Motion Sensor
The difference between a door sensor and a motion sensor includes the following.
| Door Sensor | Motion Sensor |
| A door sensor is one type of smart alarm system that allows you to check whenever your door is opened or closed. | A motion sensor is an electronic device used to notice nearby objects/ people.
|
| It is also known as a door detector. | It is also called a motion detector. |
| The voltage supply is 3V. | The voltage supply ranges from 4.8V to 20V. |
| The battery life of this sensor is up to 10 years. | The battery life of this sensor is about 4 – 5 years. |
| The signal range of this sensor is upto 200meters within open space and in a normal residence, it is 20 meters. | The signal range of this sensor is up to 4.6meters. |
Advantages and Disadvantages
The advantages of door sensors include the following.
- Enhances the security of homes or offices.
- It protects your family & kids
- Monitoring entrance and exit are very easy even when you are not available.
- Once this sensor is activated, you can get security alerts of home from the safety system, when somebody opens/closes your doors.
- Energy is conserved.
- Easy entrance and exit for materials and supplies.
- Improving the safety of units in commercial & residential buildings.
- Prevent robbers from entering the building.
- Avoid the children or elderly from entering & leaving the building
- The disadvantages of door sensors include cleaning, installation, maintenance, and cost.
Applications
The applications of door sensors include the following.
- These sensors are used in home security systems by allowing you to know whenever somebody is entering your home.
- These sensors are also frequently used for logistical applications like shipping containers, trailers, and also reusable bulk bins used for shipping parts.
- These sensors prevent cargo theft.
Please refer to this link to know more about Smart Sensor MCQs.
Thus, this is an overview of a door sensor – working with applications. These sensors can be used as home security devices and these can be arranged at the front door, back door, patio doors, windows, basement doors, and any other external doors. The top door sensors are; Nest, Ring Alarm, X-Sense, Cove, Wyze, ADT Doo, Samsung, iSmart, SABRE and Geeni. Here is a question for you, what is the magnetic sensor?